-----BEGIN PGP SIGNED MESSAGE-----
Hash: SHA512
# Cryptocat Custom Server with Apache
by: Owen Gunden
2014-02-04
tags: sysadmin
* * *
Cryptocat has instructions on how to run your own custom cryptocat server. I
just puzzled through to success. So here's another guide with hopefully a few
helpful details. Also, I'm using apache instead of nginx.
## 1. Getting the parameters straight
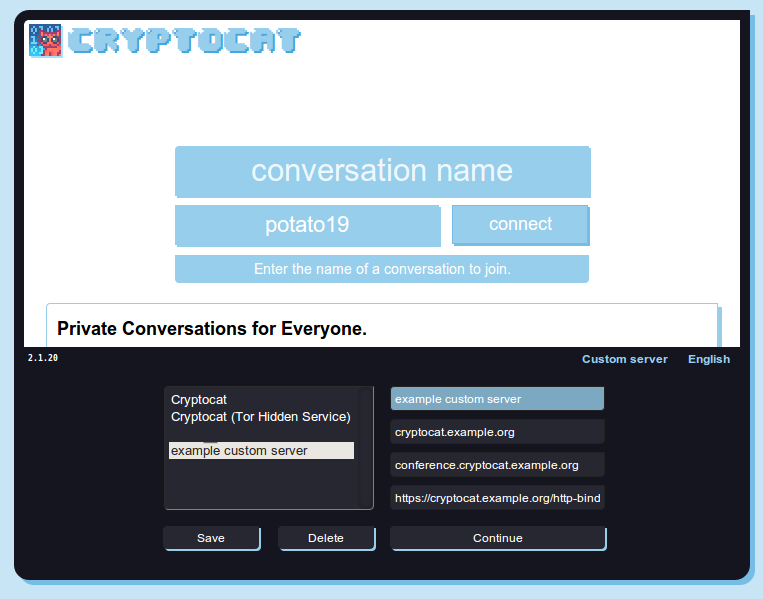 When you click "custom server" on the cryptocat UI, the above dialog slides up.
Make note of the four boxes on the right. They are, from the top:
* Name
* Domain
* XMPP Conference Server
* BOSH/Websocket Relay
The name can be anything, it's just a client-side label for the server
connection.
"Domain" is a misleading name, it actually corresponds to the "Hostname" in
your ejabberd configuration. You should create a DNS entry for this.
The third box, XMPP Conference Server, doesn't need a DNS entry. While it's not
strictly necessary, it will be easiest if you just tack "cryptocat." in front
of what you have for box 2.
The fourth box should be exactly as above, substituting your value for box 2.
## 2. Installing ejabberd
On ubuntu:
# apt-get install ejabberd
Configure ejabberd per the instructions. "`host.name`" must correspond to your
entry for box 2 above. You can leave the rest of the file unchanged (the
default is to use `conference.host.name` as the conference server, which must
correspond to box 3 above.
Once you're done with the configuration, restart ejabberd. I had an issue where
the configuration didn't take when I did `service ejabberd restart`, so you may
need to experiment with `service ejabberd stop` and/or manually killing all
processes owned by ejabberd.
The quickest way to test that your server is listening is with `telnet localhost 5280`.
Did it say "connected to localhost."? Then you're good to move on.
## 3. Configuring apache
The relevant directives are:
ProxyPreserveHost On
ProxyRequests Off
Order allow,deny
Allow from all
ProxyVia On
ProxyPass / http://localhost:5280/
ProxyPassReverse / http://localhost:5280/
You can put them in a virtual host definition (e.g. for `cryptocat.example.org`,
your box 2 entry above). You will also need to make sure `mod_proxy` is installed
and enabled on your setup.
Once you have configured apache, restart it and navigate on your web browser to
`https://cryptocat.example.org/http-bind`. Accept the self-signed certificate
(if that's what you're using). If everything is correct, you will see a message
from ejabberd.
**Important note!** If you're using a self-signed certificate, everyone who wants
to access your cryptocat server will need to first navigate to the above URL
and accept the certificate. Otherwise cryptocat will hang indefinitely on
login.
## 4. Conclusions
Setting up your own cryptocat server is a nice way to enhance your security
further, because while I'm sure the guys at `crypto.cat` don't log your traffic,
in theory they could. If you're curious about what the logs would look like,
change your ejabberd.cnf `loglevel` to 5 and see for yourself. There's no
plaintext content, but there is some metadata there.
-----BEGIN PGP SIGNATURE-----
iQGTBAEBCgB9FiEEITTGnjS8w3W1jSkZsgzzKl9/mGUFAmd8Mz5fFIAAAAAALgAo
aXNzdWVyLWZwckBub3RhdGlvbnMub3BlbnBncC5maWZ0aGhvcnNlbWFuLm5ldDIx
MzRDNjlFMzRCQ0MzNzVCNThEMjkxOUIyMENGMzJBNUY3Rjk4NjUACgkQsgzzKl9/
mGViyQf/dh1j+w03LtpIQh+NOwSq+/k+kXASNMx/hbDY2DLNlFE2QIA81E1bDsE2
i7WWr40RHNLoeVmIhf+IJeptnSrMYTQlH0jqOMW8AUgi0HLX3tq8/lpVETw6QeA8
c5RQUeaxtZnQAcoCrDJGsfTsdVYVnB6lGirjkY+hORjY3EmWL2HjLvEJEqGHTDl1
mT4WUPzswUaKo+sFHdtGJKsxE8/ucq4KYZjYFo2ZwsKNAvg9QZ3shi48RhnPeS98
hsBJJEdgH7KH6Kb/8GUnBou/N5vSBECj6itedWNYwOtdh8Hv7XuwQARW10mzbcYM
oTqXRgYXEAZnF2i/ftefXmGQpW0RSQ==
=2UaR
-----END PGP SIGNATURE-----
When you click "custom server" on the cryptocat UI, the above dialog slides up.
Make note of the four boxes on the right. They are, from the top:
* Name
* Domain
* XMPP Conference Server
* BOSH/Websocket Relay
The name can be anything, it's just a client-side label for the server
connection.
"Domain" is a misleading name, it actually corresponds to the "Hostname" in
your ejabberd configuration. You should create a DNS entry for this.
The third box, XMPP Conference Server, doesn't need a DNS entry. While it's not
strictly necessary, it will be easiest if you just tack "cryptocat." in front
of what you have for box 2.
The fourth box should be exactly as above, substituting your value for box 2.
## 2. Installing ejabberd
On ubuntu:
# apt-get install ejabberd
Configure ejabberd per the instructions. "`host.name`" must correspond to your
entry for box 2 above. You can leave the rest of the file unchanged (the
default is to use `conference.host.name` as the conference server, which must
correspond to box 3 above.
Once you're done with the configuration, restart ejabberd. I had an issue where
the configuration didn't take when I did `service ejabberd restart`, so you may
need to experiment with `service ejabberd stop` and/or manually killing all
processes owned by ejabberd.
The quickest way to test that your server is listening is with `telnet localhost 5280`.
Did it say "connected to localhost."? Then you're good to move on.
## 3. Configuring apache
The relevant directives are:
ProxyPreserveHost On
ProxyRequests Off
Order allow,deny
Allow from all
ProxyVia On
ProxyPass / http://localhost:5280/
ProxyPassReverse / http://localhost:5280/
You can put them in a virtual host definition (e.g. for `cryptocat.example.org`,
your box 2 entry above). You will also need to make sure `mod_proxy` is installed
and enabled on your setup.
Once you have configured apache, restart it and navigate on your web browser to
`https://cryptocat.example.org/http-bind`. Accept the self-signed certificate
(if that's what you're using). If everything is correct, you will see a message
from ejabberd.
**Important note!** If you're using a self-signed certificate, everyone who wants
to access your cryptocat server will need to first navigate to the above URL
and accept the certificate. Otherwise cryptocat will hang indefinitely on
login.
## 4. Conclusions
Setting up your own cryptocat server is a nice way to enhance your security
further, because while I'm sure the guys at `crypto.cat` don't log your traffic,
in theory they could. If you're curious about what the logs would look like,
change your ejabberd.cnf `loglevel` to 5 and see for yourself. There's no
plaintext content, but there is some metadata there.
-----BEGIN PGP SIGNATURE-----
iQGTBAEBCgB9FiEEITTGnjS8w3W1jSkZsgzzKl9/mGUFAmd8Mz5fFIAAAAAALgAo
aXNzdWVyLWZwckBub3RhdGlvbnMub3BlbnBncC5maWZ0aGhvcnNlbWFuLm5ldDIx
MzRDNjlFMzRCQ0MzNzVCNThEMjkxOUIyMENGMzJBNUY3Rjk4NjUACgkQsgzzKl9/
mGViyQf/dh1j+w03LtpIQh+NOwSq+/k+kXASNMx/hbDY2DLNlFE2QIA81E1bDsE2
i7WWr40RHNLoeVmIhf+IJeptnSrMYTQlH0jqOMW8AUgi0HLX3tq8/lpVETw6QeA8
c5RQUeaxtZnQAcoCrDJGsfTsdVYVnB6lGirjkY+hORjY3EmWL2HjLvEJEqGHTDl1
mT4WUPzswUaKo+sFHdtGJKsxE8/ucq4KYZjYFo2ZwsKNAvg9QZ3shi48RhnPeS98
hsBJJEdgH7KH6Kb/8GUnBou/N5vSBECj6itedWNYwOtdh8Hv7XuwQARW10mzbcYM
oTqXRgYXEAZnF2i/ftefXmGQpW0RSQ==
=2UaR
-----END PGP SIGNATURE-----